Selasa, 05 Maret 2013

Iptables Example
This is an example on how to allow some traffic input to CentOS server.
At first you already install apache, mod_ssl and mysql, but you still cannot access apache or mysql.
There is a possibility that you have not set up your firewall.
Open iptables configuration using your favorite editor.

Don't forget to restart iptables

At first you already install apache, mod_ssl and mysql, but you still cannot access apache or mysql.
There is a possibility that you have not set up your firewall.
Open iptables configuration using your favorite editor.
/etc/sysconfig/iptablesAdd 3 rule input to allow traffic for http, https and mysql.
-A INPUT -m state --state NEW -m tcp -p tcp --dport 80 -j ACCEPT
-A INPUT -m state --state NEW -m tcp -p tcp --dport 443 -j ACCEPT
-A INPUT -m state --state NEW -m tcp -p tcp --dport 3306 -j ACCEPT

Don't forget to restart iptables
#service iptables restartYou could check your current iptables configuration with:
#iptables -L

MySQLTuner-perl
Sometime you confuse what to do to make a better performance of your MySQL databases.
With MySQLTuner you can get a brief suggestion on how to tune in MySQL server.
MySQLTuner is a script written in Perl that allows you to review a MySQL installation quickly and make adjustments to increase performance and stability.
You can download the script at http://mysqltuner.com.
Here are some screenshot MySQLTuner result.


Senin, 04 Maret 2013
Advanced Mikrotik Training - Routing (MTCRE)
Training: Advanced Mikrotik Training - Wireless (MTCRE)
Location: Yogyakarta, Indonesia
Date: 15-18 November 2011 (4 days)
Organizer: CV Citraweb Nusa Infomedia (mikrotik.co.id)
Training Outline:


Photo taken during exam.


Location: Yogyakarta, Indonesia
Date: 15-18 November 2011 (4 days)
Organizer: CV Citraweb Nusa Infomedia (mikrotik.co.id)
Training Outline:
- Static Route, Policy Route, Route Mark
- OSPF
- BGP
- Basic MPLS

Photo taken before exam.

Photo taken during exam.


Setting up Internet Connection Sharing at Windows 8
The situation are:
1. You have Windows 8 and installed with VMware workstation.
2. You already have virtual server installed with CentOS 6.3 and already assign IP address 192.168.56.2
Now we want to set up an internet connection sharing on Windows 8 so virtual server could get access to the internet.
Network diagram

First check virtual server configuration which network adapter is used.
In this picture we can see it is using VMnet1.

Make sure you already configure the network at CentOS server.

Now go to Windows 8, to configure Internet Connection Sharing.
Open "Network Connections"
Control Panel\Network and Internet\Network Connections
Right click on "Ethernet" > "Properties"

Click "Sharing".
Check "Allow other network users to connect through this computer's Internet connection"
Home networking connection "VMware Network Adapter VMnet1"

After you click "OK", there will be information windows that your IP address will be change to 192.168.137.1. Click "Yes".

Now back to "Network Connections"
Right click "VMware Network Adapter VMnet1" > Properties.
Choose Internet Protocol Version 4 (TCP/IPv4) and click Properties

Edit IP address to 192.168.56.1, just like the picture bellow.
Click "OK"

Now your Windows 8 already configure as a Gateway, and server CentOS could get internet access.
Check it with ping at server CentOS.

Don't forget to set up your DNS :-)
1. You have Windows 8 and installed with VMware workstation.
2. You already have virtual server installed with CentOS 6.3 and already assign IP address 192.168.56.2
Now we want to set up an internet connection sharing on Windows 8 so virtual server could get access to the internet.
Network diagram

First check virtual server configuration which network adapter is used.
In this picture we can see it is using VMnet1.

Make sure you already configure the network at CentOS server.

Now go to Windows 8, to configure Internet Connection Sharing.
Open "Network Connections"
Control Panel\Network and Internet\Network Connections
Right click on "Ethernet" > "Properties"

Click "Sharing".
Check "Allow other network users to connect through this computer's Internet connection"
Home networking connection "VMware Network Adapter VMnet1"


Now back to "Network Connections"
Right click "VMware Network Adapter VMnet1" > Properties.
Choose Internet Protocol Version 4 (TCP/IPv4) and click Properties

Edit IP address to 192.168.56.1, just like the picture bellow.
Click "OK"

Now your Windows 8 already configure as a Gateway, and server CentOS could get internet access.
Check it with ping at server CentOS.

Don't forget to set up your DNS :-)
Jumat, 01 Maret 2013
Advanced Mikrotik Training - Wireless (MTCWE)
Training: Advanced Mikrotik Training - Wireless (MTCWE)
Location: Jakarta, Indonesia
Date: 24-27 May 2011 (4 days)
Organizer: CV Citraweb Nusa Infomedia (mikrotik.co.id)
Training Outline:
Good training, to bad there is only 6 participant and there is no outside lab. I think it would be great if the training was held with bootcamp style, camping and do outdoor wireless installation.
Test bandwidth using 802.11n

Photo during coffee break.

Photo at our classroom, it's very cramp >.<


- Wireless Security
- Access List and Connect List
- Management Frame Protection
- Radius Mac Authentication
- Encryption
- Wireless WDS and Mesh
- Wireless Transparent Bridge
- WDS
- VPLS/MPLS transparent bridging
- Wireless NStream Protocol
- Wireless 802.11n
Good training, to bad there is only 6 participant and there is no outside lab. I think it would be great if the training was held with bootcamp style, camping and do outdoor wireless installation.
Test bandwidth using 802.11n

Photo during coffee break.

Photo at our classroom, it's very cramp >.<


Print Server Mini-300PU Configuration and Printer Installation on Windows 8
First prepare all your hardware is already in place and already connected.

In this picture we can see that my PC and Mini-300PU are connected to switch via UTP cable, and all the printers already connected to Mini-300PU via USB cable. Don't forget to turn on all the device. :-)
1. Assign IP address on Mini-300PU
Make sure you already assign IP address on your print server Mini-300PU.
You can configure static or dynamic IP address using PSAdmin application, this apps usually comes with the CD when you buy Mini-300PU, or you can download it here.

Open PSAdmin check connected printer to Mini-300PU and configure IP address


At the above picture we can see that I already assign dynamic IP address and information of connected printer (Canon MP280 connected to Port2 and EPSON L200 connected to Port3)
2. Install Printer
For this time I will install printer EPSON L200 on my PC which is attached to Port3 (USB 2) on Mini-300PU.
Go to "Devices and Printers"
Control Panel\Hardware and Sound\Devices and Printers

Add Printer
Stop search
Next

Add a local printer or network printer with manual settings
Next.

Create a new port
Type of port: Standard TCP/IP Port
Next

Hostname or IP address: 192.168.23.9
Port name: Mini300PU

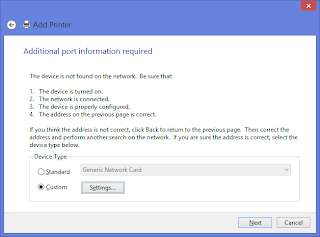
Device Type: Custom
Click Settings...
Protocol: LPR
Queue Name: lp3
Click "OK"

Choose printer driver, EPSON L200 Series
Next

Use the driver that is currently installed (recommended)
Next

Type Printer name
Next


Finish

Check again at "Devices and Printers"
Make sure "EpsonL200 on Mini300" icon already in there.

And now you can use your printer.

In this picture we can see that my PC and Mini-300PU are connected to switch via UTP cable, and all the printers already connected to Mini-300PU via USB cable. Don't forget to turn on all the device. :-)
1. Assign IP address on Mini-300PU
Make sure you already assign IP address on your print server Mini-300PU.
You can configure static or dynamic IP address using PSAdmin application, this apps usually comes with the CD when you buy Mini-300PU, or you can download it here.

Open PSAdmin check connected printer to Mini-300PU and configure IP address


At the above picture we can see that I already assign dynamic IP address and information of connected printer (Canon MP280 connected to Port2 and EPSON L200 connected to Port3)
2. Install Printer
For this time I will install printer EPSON L200 on my PC which is attached to Port3 (USB 2) on Mini-300PU.
Go to "Devices and Printers"
Control Panel\Hardware and Sound\Devices and Printers

Add Printer
Stop search
Next

Add a local printer or network printer with manual settings
Next.

Create a new port
Type of port: Standard TCP/IP Port
Next

Hostname or IP address: 192.168.23.9
Port name: Mini300PU

Device Type: Custom
Click Settings...

Protocol: LPR
Queue Name: lp3
Click "OK"

Choose printer driver, EPSON L200 Series
Next

Use the driver that is currently installed (recommended)
Next

Type Printer name
Next

Do not share this printer
Next


Check again at "Devices and Printers"
Make sure "EpsonL200 on Mini300" icon already in there.

And now you can use your printer.
Langganan:
Postingan (Atom)