Kamis, 01 Agustus 2013

Setup Management IP Address BlueCoat PacketShaper 1700 using CLI

Picture below is front panel BlueCoat PacketShaper 1700


To setup IP address BlueCoat PacketShaper 1700 using CLI, first we must connect to console.

You could connect it using USB to serial cable and console cable like the picture below.


Then use your favorite application to connect to serial port / console.
I am using SecureCRT.


To configure IP address, type:
# setup ipaddress <addr> <netmask>
example:
# setup ipaddress 192.168.0.1 255.255.255.0


After you setup ip address you could log in to web configuration.
Type: http://192.168.0.1/
on your browser.


Senin, 22 Juli 2013

NAT CISCO Router Configuration

This is an example to advertise your internal WEB Server and DNS Server using CISCO Router.


Example Network Diagram

The configuration are like the picture above.
You have one CISCO router which only have one ip address public 10.10.10.10 and you have WEB server and DNS server on your DMZ network 172.17.1.0/24

Step 1
Make sure your CISCO router already have access to the Internet.
Configure ip address public:
interface FastEthernet0/0
 ip address 10.10.10.10 255.255.255.0
Configure default gateway to your ISP
ip route 0.0.0.0 0.0.0.0 10.10.10.1 

Step 2
Make sure your WEB server and DNS server could have access to your router.
Configure ip addess private for DMZ network:
interface FastEthernet0/1
 ip address 172.17.1.1 255.255.255.0

Step 3
Use NAT so your WEB server and DNS server could have access to the Internet.
Configure NAT overload:
ip access-list standard NAT-MASQUERADE
 permit 172.17.1.0 0.0.0.255

ip nat inside source list NAT-MASQUERADE interface FastEthernet0/0 overload

interface FastEthernet0/0
 ip nat outside

interface FastEthernet0/1
 ip nat inside

Step 4
Advertise your WEB server and DNS server to the Internet using NAT
NAT configuration:
ip nat inside source static tcp 172.17.1.3 80 10.10.10.10 80 
ip nat inside source static tcp 172.17.1.3 443 10.10.10.10 443 
ip nat inside source static tcp 172.17.1.2 53 10.10.10.10 53 
ip nat inside source static udp 172.17.1.2 53 10.10.10.10 53 


#####################################################

Below is the complete configuration on CISCO router:
hostname router
!
interface FastEthernet0/0
 ip address 10.10.10.10 255.255.255.0
 ip nat outside
!
interface FastEthernet0/1
 ip address 172.17.1.1 255.255.255.0
 ip nat inside
!
ip nat inside source list NAT-MASQUERADE interface FastEthernet0/0 overload
ip nat inside source static tcp 172.17.1.3 80 10.10.10.10 80 
ip nat inside source static tcp 172.17.1.3 443 10.10.10.10 443 
ip nat inside source static tcp 172.17.1.2 53 10.10.10.10 53 
ip nat inside source static udp 172.17.1.2 53 10.10.10.10 53 
ip route 0.0.0.0 0.0.0.0 10.10.10.1 
!
ip access-list standard NAT-MASQUERADE
 permit 172.17.1.0 0.0.0.255
!
line con 0
line vty 0 4
 login
!
end

Jumat, 07 Juni 2013

Find files on CentOS using locate

OS: CentOS 6.3

If you want to search a file on CentOS you could use locate and updatedb command.
First install mlocate
# yum install mlocate
Now you can find files on your system.
# locate <file_name_you_want_to_find>
To update database for mlocate use
# updatedb


Rabu, 05 Juni 2013

Enable SNMP on VMware ESXi 5.0

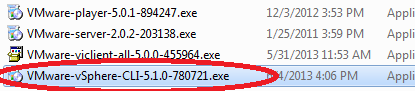
To enable SNMP on your VMware ESXi 5.0, first you should install VMware vSphere CLI.

VMware vSphere CLI

Set Up Community
vicfg-snmp.pl --server <IP or host name> --username <username> --password <password> -c <community>
Check status:
vicfg-snmp.pl --server <IP or host name> --username <username> --password <password> -s
Enable SNMP:
vicfg-snmp.pl --server <IP or host name> --username <username> --password <password> -E
Disable SNMP:
vicfg-snmp.pl --server <IP or host name> --username <username> --password <password> -D

Picture below is an example of snmp check status:

VMware vSphere CLI

Selasa, 05 Maret 2013

The Best IPv4 Calculator

One of my favorite IPv4 calculator on the Internet.
You can find it here.
IPv4 Calculator

Iptables Example

This is an example on how to allow some traffic input to CentOS server.

At first you already install apache, mod_ssl and mysql, but you still cannot access apache or mysql.
There is a possibility that you have not set up your firewall.

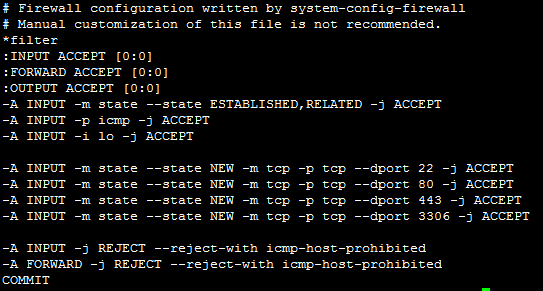
Open iptables configuration using your favorite editor.
/etc/sysconfig/iptables
Add 3 rule input to allow traffic for http, https and mysql.
-A INPUT -m state --state NEW -m tcp -p tcp --dport 80 -j ACCEPT
-A INPUT -m state --state NEW -m tcp -p tcp --dport 443 -j ACCEPT
-A INPUT -m state --state NEW -m tcp -p tcp --dport 3306 -j ACCEPT
iptables

Don't forget to restart iptables
#service iptables restart
You could check your current iptables configuration with:
#iptables -L
iptables


MySQLTuner-perl


Sometime you confuse what to do to make a better performance of your MySQL databases.

With MySQLTuner you can get a brief suggestion on how to tune in MySQL server.

MySQLTuner is a script written in Perl that allows you to review a MySQL installation quickly and make adjustments to increase performance and stability.


You can download the script at http://mysqltuner.com.

Here are some screenshot MySQLTuner result.

MySQL Tuner

MySQL Tuner